Search This Blog

Showing posts with label everyday recipe. Show all posts

Friday, October 7, 2011

Kitchen Tip: Saving Berries

Maru and I love strawberries. I actually really like almost all berries, but she is particularly partial to a classic strawberry. The main way we consume them is in smoothies, so we use them up fast. We're not in easy reach of a U-pick farm here in the city, and the 1lb boxes of strawberries can often cost as much as $5 a pop, but sometimes you get lucky and the corner grocery store wants to liquidate boxes of berries that are a little overripe. This happened to me the other day when I found the 1lb boxes for 89 cents each! So I bought 12. Yes, 12 pounds of strawberries. It was all that would fit in my market bag. What can you do with 12 pounds of berries for two people? Why, freeze them for later of course!

Frozen berries are perfect for smoothies, and they are also great for making quick little fruit toppings and compotes. Throw a couple cups worth in a sauce pan with a couple tablespoons of sugar and cook them down, and there you have it! A yummy topping for pancakes, waffles, french toast, crepes, strawberry shortcake, etc.

Here is the process we follow to get our berries in the freezer:

1. Clean them really well.
2. For strawberries, cut off the end.
3. Place the berries in an even layer on a cookie sheet. Strawberries can be set up on their flat end.
4. Put the cookie sheet in the freezer and let them freeze for 1-2 hours.
5. Label a ziploc bag with the date. Break the berries off of the cookie sheet and bag them, then return to the freezer until desired. They will keep really well for a couple of months and reasonably well for a couple months beyond that. Over time, they just start to lose a little flavor.

By freezing them on the cookie sheet first, you prevent them from freezing into one big lump. You'll actually have separate berries in the bag.

Here is our traditional morning smoothie recipe. This makes two large glasses:

2 bananas
1 cup frozen strawberries
1 cup yogurt
Juice of one orange
1/2 teaspoon vanilla extract
1/4 cup water (just to make it more drinkable)

Throw everything in a blender and puree. Mmmmm.

Wednesday, October 5, 2011

Recipe: Parsley Walnut Pesto

We love pesto, and really, who doesn’t? While the classic basil and pine nut pesto will always be a favorite, there are dozens of ways to make this simple dressing (I feel like it’s more of a “dressing” than a “sauce”). Basically, you just need a fresh herb or leafy green and some kind of nut. Add olive oil, garlic, salt, and pepper, and voila!

One combination that has become a staple for us is this recipe, which uses walnuts and parsley, both of which are significantly cheaper than their traditional counterparts (unless you have basil growing in your garden, which we currently do not L). Parsley is a seriously underappreciated herb in my opinion. When it is good and fresh, the flavor is sharp and bright and can add a lot to a dish. Here, it works perfectly with the walnuts. I am always partial to flat-leaf parsley as opposed to curly-leaf, because I think it has a stronger flavor, but use what you have or can find.

Probably the best thing about this dish, other than the deliciousness, is how ridiculously quick and easy it is. Far and away the step that takes the longest is bringing the water to a boil, which easily makes this a workweek dish. And the leftovers keep really well for lunch the next day! It’s even good cold. You will love this pesto. Seriously.

For some reason, roasted carrots have become our companion vegetable for pesto, probably because they complement the green. We just cut them into spears, put them in a glass dish with a little olive oil, a pat of butter, salt, and pepper, and then roast them at 375⁰F for about 35 minutes.

Also, this is a great recipe for whole wheat pasta, because it stands up well to the strong, nutty flavor of the pesto. Enjoy!

PS You'll note there are some roasted red peppers on that plate too. See the next entry!

Parsley and Walnut Pesto Pasta

1 lb whole wheat spaghetti noodles

1 cup chopped walnuts

1 bunch parsley

¼ cup olive oil

2 cloves garlic, still in their paper

1 teaspoon salt

½ teaspoon black pepper

2 dried red chiles, deseeded (optional, they give it a nice, subtle kick)

½ cup grated parmigiano or romano cheese (either one is good)

Water to boil pasta

1. Put the water in a large pot and start to bring it to a boil while you prepare the pesto. Add ½ tablespoon salt to the water.

2. Place a small non-stick or cast iron skillet over medium heat. Put the garlic cloves in the skillet and roast them for about 5 minutes, turning frequently. Most pesto recipes just have you put raw cloves in. It tastes good like that, but can be a little strong. Light roasting mellows them out a bit.

3. Separate out ¼ cup of the nuts. Set aside.

4. In a food processor or blender (it is a little easier to do in a food processor), place the remaining ¾ cup of walnuts, oil, salt, pepper, and chiles if using. Pulse until blended.

5. Remove the roasted garlic from its paper and add it to the food processor. Pulse until blended.

6. Wash the parsley. Twist off the bottom part of the stems, from where the leaves start to come out (usually about 3 or 4 inches up). Discard the extra stems and put the whole top part of the bunch in the food processor (including the tender top stems).

7. Process until a smooth paste is formed. You may need to add another drizzle or two of olive oil for a nice consistency.

8. Scrape the pesto out of the food processor bowl and into the bottom of a bowl large enough to hold all of the pasta. Add the grated parmigiano and mix. Set aside.

9. Cook the pasta until al dente. Drain, and then immediately put it in the bowl with the pesto. Using a pair of forks or tongs, toss the pasta until it is evenly dressed.

10. Serve, then top with extra chopped nuts and a little extra parmigiano.


PS

Sunday, September 4, 2011

Recipe: No-Fry Eggplant Parm


Eggplant is a great vegetable. It can be tricky to use since it soaks up oil and big ones can be a bit bitter, but when it’s done right, I love the flavor of it. I am also a big fan of eggplant parmesan, but it can be hard to find one that’s not swimming in grease. Also, to make traditional eggplant parm involves a bit of a process; salting the eggplant, rinsing it, coating it, frying it. I figured this technique out a few years ago after taking the idea of roasting the eggplant instead of frying. The roasting brings out the sweetness of the eggplant and tones down the bitterness. Plus, the end result isn’t greasy and, more importantly, it’s delicious! If you’re looking for something that is traditional, this is not it, but this is a great dish, and it’s super quick if you have the right things on hand. This one is easily a weekday meal.

One rule here is you must use real parmigiano reggiano, not the stuff from the green can. Now, I know that parmigiano is like $12-16/lb, but you can buy a $6 chunk of it, and it will cover this dish plus some salads, pastas, and maybe some veggies. A little goes a very long way.

A suggestion is to use homemade bread crumbs. I wouldn’t call this one a hard and fast rule, but you get better flavor when they are bread crumbs you make, and it’s so easy! As you get to the end of a loaf or when those last couple pieces start to become stale, start a bread collection in a Ziploc in the freezer. To get crumbs, just take a few chunks and run them through the food processor.

Here is the basic recipe. You can adjust it to your taste with more or less sauce. We just made one with very little sauce and some spinach that was starting to wilt. It was great!

This recipe will serve 6 people generously. You can easily halve it (9x9 pan) or increase quantities to make a deeper casserole.

2 large eggplants

4-5 cups stewed tomatoes or tomato sauce

1 ½ cups bread crumbs (preferably homemade)

1 cup finely grated parmigiano reggiano

Salt and pepper to taste

A few tablespoons olive oil

Dried oregano (optional)

Sliced fresh mozzarella (optional)

Preheat the oven to 375⁰. Slice the eggplants into ¼ inch-thick rounds. Heat a large non-stick skillet, cast iron skillet, or griddle (or a combination to move things along faster) over high heat. When hot, and working in batches, place the eggplant slices down in the pan. Let them cook for about 1-2 minutes per side or until nicely browned but not burnt. You don’t need any oil, you’re just dry roasting. A grill or the broiler can work as well. As the slices finish cooking, set them aside.

Season the breadcrumbs generously with salt, pepper, and oregano if using. Take out a 9x13 glass or corningware baking dish. Build the casserole!

Start with a layer of sauce, then place overlapping eggplant slices down. Top with bread crumbs, then parmigiano, then a quick drizzle of olive oil. Continue with another layer of sauce, then eggplant, bread crumbs, cheese, etc. until all of the eggplant is used up. Save some bread crumbs for the very top layer. If you are using fresh mozzarella, place the slices on the very top. You can also top with slices of fresh tomato. Drizzle a little more olive oil over everything, and then place in the oven. Bake for 30-40 minutes or until the top is golden brown and the whole thing is bubbling. Serve immediately. Enjoy!

Monday, August 22, 2011

Recipe: Faro and Roasted Vegetable Salad


AND... We're back!

So it has been a long while. I haven’t posted all summer, because Maru and I have been in the process of traveling and moving, moving and traveling. It’s been a little hectic! But now we are settled into our apartment in Brooklyn, NY!! We’ve got a great little place, we’ve made the small kitchen entirely functional, and in spite of all the wonderful eating out options this city has to offer, we still plan on making our own food on a regular basis. Take, for example, this hearty salad we made this past week. I actually copied this idea from a recipe in one of Jaime Oliver’s cookbooks. It’s one of my new favorite things. It requires very little actual work and this time of year, with vegetables everywhere, it is really cheap. With tons of vegetables and a healthy, whole-grain base, this one is good for you too. You will be amazed at how tasty this dish is. You could use it as a side dish with just about any entrée, but it also stands as a meal all on it’s own.

The time for this recipe goes into waiting for vegetables to roast. It will not be ready quickly, but this recipe makes a lot of food. You’ll have leftovers for quick weekday lunches or snacks. I’ve listed the ingredients that I used, but you can use whatever vegetables you have on hand and/or that you like. The original recipe calls for faro or spelt, which is fabulous if you can find it; nutty and chewy. Bulgur is much easier to come across and also good. Either way, enjoy!

Faro (Bulgur) salad with roasted vegetables

2 cups faro or bulgur

1 medium-size eggplant

2 medium-size zucchini or summer squash

2 red bell peppers

1 ear of corn

1 fennel bulb

1 large onion

4-6 cloves of garlic

A little under ¼ cup of balsamic vinegar (or an herb vinegar)

Salt and pepper to taste

Up to ½ cup olive oil

¾ cup chopped fresh herbs (a combination of parsley, mint, and basil is best)

Grated parmigiano or romano cheese (optional)

Preheat the oven to 400⁰ F. Slice the eggplant and zucchini or summer squash into ¼” thick half moons. Roughly chop the bell peppers, onion, and garlic. Remove the leafy part of the fennel bulb and set aside. Remove the tough outer later of the bulb, then thinly slice the rest. Cut the ear of corn into three pieces. Place all of the vegetables in a shallow roasting pan, drizzle with olive oil, and season with salt and pepper. Ideally, you want the vegetables to be in one even layer, so you will probably need two roasting pans. Place the pans in the oven and roast the vegetables for 40-50 minutes or until they begin to brown evenly. Every 10 minutes or so, give them a stir with a pair of tongs. Once they come out of the oven, drizzle some vinegar on them and let them cool for a few minutes.

Meanwhile, place the faro or bulgur in a bowl, cover with cold water, and let sit for 20 minutes. Pour off the soaking liquid, put the soaked grain in a large pot, cover with double the amount of water, add a dash of salt, and place on the stove on high heat to bring to a boil. Simmer the grain for about 15-20 minutes or until tender but still slightly chewy. Drain off the water and place in a large bowl. Add a drizzle of olive oil, then let it cool slightly.

Once the vegetables are cool enough to handle, give them all a rough chop. The chop doesn’t have to be pretty. This is a rustic dish. You just want things to be more or less bite size. The corn can be cut right off of the cob. Add the chopped veggies to the grain, and then add the herbs and the leafy part of the fennel. Generously salt and pepper the salad, add another drizzle of vinegar and oil, then mix well. Taste and adjust seasonings. Serve warm with grated parmigiano or romano.

Thursday, June 2, 2011

Recipe: Arroz con Pollo

With New York on our mind, we were thinking about an awesome meal we had in Harlem at La Fonda Boricua when we visited a few years back. It’s a Puerto Rican place made famous in an episode of Throwdown with Bobby Flay. Needless to say, Mr. Flay lost to the restaurant’s chef. His arroz con pollo just wasn’t up to snuff. And after we tried it, we weren’t surprised. It’s a simple comfort food dish that the local chef makes sing.

Fast forward to two days ago when we were watching an episode of The United States of Tara and the main character orders arroz con pollo. Cue the craving and the trip to the market. I found this recipe online but modified it quite a bit. Here’s how I did it. This was our first time making arroz con pollo at home, and it won’t be the last. It’s delicious, filling, relatively quick, and even healthy (just a little bacon, but not too much).

It takes about 45 minutes to make this dish from start to finish, so it’s not super-fast, but it’s not fussy either. While things fry and simmer, you can take care of other tasks. It won’t have you tied up the whole time it’s cooking. This recipe easily serves four. You could add a couple more pieces of chicken for an extra person or two.

Arroz con pollo

2 complete chicken legs (thigh and drumstick), skin on

4 strips bacon (I used a really smoky one, which was great for the final flavor)

2 Tablespoons olive oil

1 medium white onion, chopped

2 small carrots, chopped

½ teaspoon cumin seeds

2 bay leaves

2 bell peppers, chopped (I used one orange and one red)

1 jalapeño, minced (optional)

4 cloves garlic, minced

1 cup white rice (you could do brown too, just cook it a little longer)

2 cups stock or water

1 cup stewed tomatoes

4 sprigs fresh oregano (or 1 Tablespoon dried)

½ cup chopped fresh cilantro

1 teaspoon salt

Black pepper to taste

In a large, heavy-bottomed pot (I used our cast iron pot. A dutch oven would be perfect also.), fry the bacon until crispy over medium heat. Remove the bacon, drain it, and crumble or cut it into small pieces. Season both sides of the chicken with salt and pepper. Add the chicken to the pot skin side down. Fry for about 5-7 minutes or until golden brown, then turn over and brown the other side, about 5-7 more minutes. At this point, you’re just searing the chicken for flavor, not actually cooking it. Remove the chicken from the pot and set aside.

Add the olive oil and raise the heat to medium-high. Throw in the onions, carrot, cumin, and bay leaf and sautee, stirring constantly until starting to soften, about 5 minutes. Add the garlic, jalapeño, and bell peppers, and then sautee for another 3 minutes or so until very fragrant. Add the rice and fry, stirring constantly, for a few more minutes.

Pour in the stock along with the tomatoes, teaspoon of salt, oregano, bacon pieces, and half of the cilantro. Bring to a boil, stir to combine well, and then place the chicken in the broth in an even layer (it should be covered), then lower the heat to low, cover the pot, and simmer for about 25 minutes or until the rice is cooked. You don’t need to stir the dish while it cooks, just let it be. Wash your cutting board and knife while you wait. It’s a one pot meal with almost no dishes!

To serve, pile some rice on plate, place a piece of chicken on top, then sprinkle with cilantro. No sides needed. Enjoy!

Thursday, May 26, 2011

Food Ideas: Desayuno Mexicano - Mexican Breakfast

Huevos a la mexicana con frijoles

I love breakfast food. Perfectly crispy hashbrowns, smoky bacon, fresh eggs… mmm. Or French toast or pancakes with maple syrup, also mmm… While I sometimes have a hankering for an American breakfast that I can only satisfy at home here in Puebla (restaurants here just don’t do hashbrowns, French toast, or pancakes well at all), I LOVE a good Mexican breakfast. Breakfast dishes here in central Mexico are essentially a dozen different ways to combine eggs, tortillas, and salsas with a side of delicious beans.

You don’t really need a recipe for most of these, so what I figured I would do is run through a list of some of my favorites just to give you ideas for a weekend breakfast or even a midnight snack. If you have some salsa on hand (hopefully that you made yourself!), eggs, and tortillas (corn or flour), you’re already more than halfway there. Be aware that the amount of salsa in a Mexican breakfast can be high. Even if you keep it mild, it’s still a lot of acid. Can be a bit much if you’re not used to it, but once you get used to it, you will crave it in the morning. So here it goes. Pick your favorite, put your spin on it, make sure you have some beans on the side, and enjoy!

Here are a few different versions of scrambled eggs:

Huevos a la mexicana: These are scrambled eggs with tomato, onion, and chile (usually Serrano or jalapeño) to reflect the colors of the Mexican flag. Restaurants sometimes just toss some pico de gallo in scrambled eggs and call it good. I prefer the way my mother-in-law makes them (she doesn’t cook much, but her huevos a la mexicana are perfect). Basically, the key is to cook the tomato like crazy and use a fair amount, one roma tomato per egg. Heat some oil, add the chopped tomato with a little onion, and sautee it over medium-high heat for 5-10 minutes, or until the tomato starts to brown. Add as much or as little diced chile as you like, cook for a minute, then add your beaten eggs and cook however you like ‘em. With the tomatoes almost caramelized, you end up with sweet and spicy. Perfect.

Huevos con tocino, jamón o chorizo: Fry up either a little chopped bacon, ham, or chorizo, then throw your beaten egg in and scramble. Great on a warm flour tortilla with a little Tabasco sauce.

Huevos al albañil: Heat up either green or red salsa, scramble your eggs, then dump them into the hot salsa. They should be thoroughly bathed in the salsa.

Here are a few different versions of eggs sunny-side up or over-easy:

Huevos rancheros: Red salsa is the most traditional for this, but if you have green, go for it. Heat a little oil in a pan, quickly fry two tortillas (corn or flour), set them aside, and then cook your eggs as desired. Place one egg on top of each tortilla, then pour warmed salsa over the top. If you have it, add a little shredded cheese or cream. You can also add a slice of ham in between the tortilla and the egg. Classic.

Huevos divorciados: You need green and red salsa for this one. Basically, make huevos rancheros, but bathe one egg in green and the other in red. Makes for a slick presentation.

Huevo estrellado: If you’re not in the mood for a lot of salsa, just fry up your tortilla(s) and put your fried egg on top. It’s a nice alternative to toast.

And one of my all-time favorites at home or at a restaurant…

Chilaquiles: For chilaquiles, you need a far amount of either red or green salsa, and you need to make your own tortilla chips from corn tortillas (If you buy them, make sure they are chips made from actual tortillas and not flavored in any way. This dish won’t work with your run-of-the-mill commercial tortilla chips. They would fall apart and be too salty.). It’s really easy and a great use of stale tortillas. Cut them into little triangles (8 per tortilla) and fry them in batches in hot oil, draining them on paper as you remove them. Once your chips are ready, slice a little onion (1/4 of an onion or so), heat a tablespoon of oil in a large frying pan, fry the onion for a couple minutes, then dump in the salsa. Heat the salsa for a couple minutes, then add the chips to the pan and toss to coat. Once they are evenly coated and just starting to become a little more pliable, take them off the heat, plat them, and top with shredded cheese (cotija is excellent), sour cream, raw onion if you like, and avocado if you have it on hand. To really send this dish over the top, you can add a protein, like shredded chicken, a couple of fried eggs, or even a piece of skirt steak. Yeah, that's good.

Thursday, May 19, 2011

Recipe: Vegetarian Chili (Crockpot)

This is a simple recipe for vegetarian chili that I’ve developed with a little experimentation. It’s great because it cooks in the crockpot. You can prepare it the night before, leave everything in the crockpot in the fridge overnight, then plug it in and turn it on when you go to work and come home to a delicious slow-cooked meal. Prep time here is minimal (about 10-15 minutes), and you only need one pan apart from the crockpot. You could make the chili without precooking anything, but I think you get a deeper flavor if you sautee the veggies first with the chili powder as described here.

Since the chili is done in the crockpot, all of the beans and lentils are dried instead of canned. They are cheaper this way, and the flavor and texture are better.

As far as vegetables go, celery, onion, and carrot are the base, but from there, add whatever you have in your fridge. Bell peppers are really good. You could also throw in potatoes, winter squash, peas, corn, turnips, etc. I would just avoid soft vegetables like zucchini as they will just disintegrate with the slow cook time.

If you wanted to do a meat chili, you could follow the same steps, just cut down on the amount of legumes and brown the meat before adding the veggies and chili powder.

The spiciness of your chili really depends on the chili powder you use. If you use the chili powder recipe I posted yesterday along with the ingredients outlined here, you’ll have a nice, medium-hot final product.

Like all chili, this recipe is great to freeze. Since we normally cook for two, we usually have quite a bit leftover, even after eating it for lunch the next day. Just put the leftovers in a sealed container in the freezer and thaw on the stove or in the microwave whenever you want. It’s a homemade TV dinner.

Toppings should be whatever you like; cheese, yogurt or sour cream, raw onion, chopped cilantro, chives, corn bread, etc.


Vegetarian Chili (quantity is for a 3 liter crockpot)

3 Tablespoons veggie oil (this is the only added fat)

1 medium onion, chopped

2 stalks celery, chopped

2 medium carrots, chopped (total volume of carrots and celery should equal the onion)

2 bay leaves

1 jalapeño, seeded and diced

4 cloves garlic, minced

3 Tablespoons chili powder (see recipe here)

½ ounce tequila or mezcal or ½ cup of beer (optional)

2 cups dried, mixed lentils and beans (I usually use about ¾ cup of brown lentils, ¾ cup pinto beans, ¼ cup black beans, ¼ cup garbanzos. Use whatever beans you like best. I recommend a good amount of lentils as it makes for a “meaty” chili. Red lentils in particular give a nice meaty texture to the finished dish.)

1 cup stewed or canned tomatoes (recipe here)

2 teaspoons salt

1 Tablespoon brown sugar

Water to cover (I’ve used stock in place of water before. It doesn’t make much difference though. The flavor from the spices and the beans is quite enough.)

In a large frying pan over medium-high heat, warm the oil and add the onion, carrot, and celery. Cook until the vegetables begin to soften, about 5 minutes. Add the garlic and jalapeño and cook for another 2 minutes, until the garlic is fragrant. Add the chili powder and stir to combine. Cook for about another minute until the chili powder begins to darken.

If you are using tequila, beer, or mezcal, add it now to deglaze the pan, cook until the liquid evaporates, scraping the bottom and sides of the pan, and then dump everything into the crockpot. If you are skipping the alcohol, dump the cooked veggies into the crockpot, then add a cup of water to the hot pan and scrape the sides and bottom. You don’t want to lose all that chili powder!

Rinse the beans and lentils and remove any pits or stones you may find. Add them to the crockpot. Add the tomatoes, salt, and brown sugar. Fill the crockpot within a ½ inch of the top with water. Mix everything to combine.

Cook on low for 8-10 hours or on high for 4-6 hours. Serve with desired toppings and freeze any extras. Enjoy!

Note: Chili is an acid bomb of a dish. The added sugar in this recipe will help to smooth things out a bit, along with yogurt, cheese, or sour cream if you add them. Sometimes though, the tomatoes you get are just more acidic. If you try the cooked chili and you think it might burn a whole through your stomach, add about ¼ teaspoon of baking soda to it and stir before serving. This will help to neutralize some of the acidity.

Wednesday, May 18, 2011

Recipe: Chili Powder

Grinding your own spices and making your own spice blends is really simple. The main advantage of making your own, other than cost (whole spices are usually much cheaper), is flavor. What you buy already ground at the supermarket is not necessarily that fresh, and even if it is, how long is it going to take you to use up that whole thing of ground cinnamon? By the time next year rolls around and you want to sprinkle some on your French toast, it will have almost zero flavor. If you buy whole cinnamon sticks though, you can grind as needed, and the whole sticks will still be flavorful for a long time (like years).

The only kitchen gadget you need is a spice grinder. In my experience, they can be hard to find in the store as they are not a sought-after item, but we live in the age of the Internet! Find one online. Should run you about $25-45 depending on how fancy or powerful it is.

Two spice blends I commonly use are chili powder and curry powder (or garam masala). For right now, let’s talk chili. Next time you’re in the store, or if you have it in your cabinet, pick up a thing of chili powder and read the ingredients. If they bother to list the spices, you’ll probably see cumin and pepper and several different chiles. There is also most likely onion powder, garlic powder, and some additive to prevent caking. When you make the powder yourself, you can skip the onion and garlic powder. I think they put that in there to cover up the loss of flavor from old, ground spices. You’re going to put garlic and onion in your chili, so you don’t need the powder.

I've tried several different recipes for chili powder that I've found online, sometimes with lots of different spices. I think I have nailed it now though. Not to say there won't be future experiments, but this blend is really good.

This recipe makes about ½ cup of chili powder, enough for about three batches of chili. It is spicy. If you want to make it milder, cut down on or cut out the chiles de arbol. They are there for heat. The guajillos and anchos are there for flavor, don’t skip them. And if you want things to be hotter, add a couple more of the little guys.

Another great thing about making your own chili powder is you can put what you want into it. If you want to go heavier on the cumin, do it. Want to add cocoa powder? It also adds nice flavor. For your first time though, follow the recipe, other than adjusting for heat as needed. It is tested and solid.

So here is the recipe.

Left to right: anchos, guajillos, chiles de arbol

Chili Powder

2 ancho chiles

2 guajillo chiles

5 chiles de arbol

1 teaspoon cumin seeds

1 teaspoon coriander seeds

½ inch piece of cinnamon

½ teaspoon black peppercorns

Remove the stems and seeds from the chiles and tear them into pieces. Place everything except the peppercorns in a dry skillet over medium-high heat. Stirring constantly, dry fry the spices until they begin to turn a few shades darker and become very fragrant. It should take 8-10 minutes. Don’t let the spices burn. If anything does turn black, remove it. Probably your best measuring stick are the coriander seeds, since they start out pretty light. Once they are a golden brown, you’re ready.

A word of caution: as those chiles roast, they will release oils that may bother your nose and eyes if you’re not used to it. Open a window and turn on your exhaust fan.

Put the spices on a plate and let them cool. Once they are room temperature, add the peppercorns and grind everything in batches. Be careful of the fine powder that comes off the grinder when you take the lid off. You don’t want to breathe that in.

Mix the ground spices to make sure everything is uniformly distributed and store in an airtight container. It will be flavorful for about a month and not-too-bad the following month. See how easy it is?

This powder is great for your favorite chili, but you can also sprinkle it on cucumbers, jicama, or even mangos and pineapple like they do here in Mexico. Go nuts.

Sunday, May 15, 2011

Recipe: Pasta in Pink Sauce

In my entry on our travels to Mazunte, Oaxaca, I mentioned a phenomenal Italian restaurant that we ate in. One of the dishes we had there was fettuccini in pink sauce. Neither of us had ever had pink sauce before and we loved it. It´s basically tomato sauce with cream. We’ve made it a couple of times at home now. It’s straightforward and as easy to do as most pastas. If you have your own preferred basic tomato sauce, use that and just add the cream. You’ll be amazed at how much the flavor changes. Here’s how we did it. (We were hungry though, and forgot to take a picture!)

This will serve four people as a main course and eight as a side dish.

Pasta in Pink Sauce

1 lb. dried pasta (fettuccini, spaghetti, linguini are good)

2 Tablespoons olive oil

½ cup diced onion

¼ cup diced carrot

¼ cup diced celery

1 bay leaf

4 cloves garlic, minced

2 teaspoons chopped, fresh oregano (or 1 teaspoon dried)

3 cups stewed tomatoes (use frozen or canned)

½ cup heavy cream

Salt and pepper to taste

½ cup chopped, fresh parsley

Shredded parmigiano (optional)

Put a pot of salted water on to boil for the pasta. As it heats up, chop the vegetables. Heat the oil over medium-high heat in a large skillet. Add the onion, carrots, celery, and bay leaf and cook until the vegetables begin to soften, about 5 minutes. Add the garlic and cook, stirring constantly, for another 2 minutes, then add the oregano and cook for another minute until fragrant. Add the stewed tomatoes (If you are using the frozen version, you can put the frozen chunks right into the pan. Just break them up and keep everything moving.) Bring the sauce to a boil and simmer for about 10 minutes or until it begins to thicken. Taste and add salt and pepper. Stir in the cream, taste, and adjust salt again. You’ll be amazed how much that little bit of cream changes the flavor!

Cook the pasta until it is about 1 minute shy of being done. It should be a little too al dente. Take a scant cup of the pasta water and add it to your sauce (if the sauce is still pretty thin, you can just add ½ cup). Drain the pasta and then immediately add it to the sauce. Stir to combine and continue cooking until all of the excess liquid is absorbed and the pasta is perfectly al dente, about 2-3 minutes. Taste and adjust seasoning.

Note: This trick of adding pasta water to the sauce works great. The water is salty and starchy from cooking the pasta and adds a really nice flavor. It is also always important to finish cooking your pasta in the sauce so that the flavors all come together, which is why you take it out before it’s done.

Plate the pasta and top with parsley and parmigiano. Enjoy!

Monday, May 9, 2011

Recipe: Arroz Verde


Arroz verde con plátanos fritos

I remember when my siblings and I were little, my mom used to do Spanish Rice every once in a while from a mix. We loved it at the time, then when I got older, I started to think it was just kind of tasteless. You know that red rice you get at “Mexican” restaurants in the US? It’s kind of mushy and has almost no flavor. I just always think, “Why did you bother putting this on my plate?”

This rice is the real deal. Its fluffy, slightly al dente texture is great, and the flavor is delicious, but understated enough to quickly become a comfort food. It’s also very versatile as far as serving goes. As a side dish, it can accompany just about anything, and you can also serve it as a course all its own or even make a complete meal out of it (as we just did!).

Popular ways to serve Mexican rice is with sliced bananas (fried or raw), a fried egg on top, or with a spoonful of beans. There are many possibilities.

Here is the recipe for our house favorite, green rice. At the end of the recipe you’ll find how to make red or white rice as well. Mexican rice is basically a pilaf with the rice grains being fried before steaming them. What varies with each color is what you mix into the cooking liquid.

I will be honest and let you know that you probably won’t get perfect rice the first few times you make this dish. It’s tricky to get the texture just right, but if you follow these steps, you should be good to go. Just don’t be dissuaded if your rice ends up a little over or underdone. Try, try again. It is well worth it. Once you get the hang of making Mexican rice, it will be a meal that you can prepare very quickly. It’s also cheap, delicious, and nutritious (especially if you opt for brown rice).

Arroz Verde

2 poblano chiles

2 Tablespoons chopped onion

1 clove garlic, peeled

¼ c loosely packed fresh epazote (You can skip the epazote, or use cilantro. Either way will change the flavor significantly.)

1 teaspoon salt

2 c stock or water (Veggie or chicken stock adds a nice flavor to the rice, especially if it is homemade, but you can get delicious rice just with water.)

2 Tablespoons veggie oil

1 c medium grain rice (White or brown is fine. See below for cooking difference for brown rice. Note that brown rice will give a very different texture and a nuttier flavor.)

½ c mixed vegetables (Diced carrot, corn, diced potato, and/or peas are most common. Carrots or potatoes should be cut to the size of a grain of corn.)

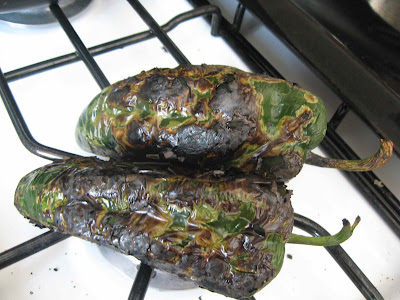
With a grill, broiler, griddle, or flame of a gas range, roast the poblanos until blackened evenly all over. Wrap them in a clean towel or place them in a paper bag to sweat for 15 minutes. This “sweating” will make them easier to peel. Remove the stems, seeds, and blackened skin from the chiles and place them in a blender.

These chiles are properly roasted!

To the blender add the onion, garlic, epazote, salt, and stock or water. Blend until everything is well liquefied and well combined.

In a medium sauce pan over medium high heat, warm the oil. When hot, add the rice. Fry for about 3-5 minutes, stirring constantly until the rice grains go from translucent to opaque and give off a nutty aroma (Brown rice will pop a little like popcorn!).

This rice is fried and ready for the liquid.

Add the liquid mixture all at once. It will spit and bubble furiously for about 5 seconds then calm down. Be careful. Add the mixed vegetables. Stir everything together.

Bring the rice to a boil, then cover and turn the heat down to low. Simmer the rice for about 20 minutes (If you are using brown rice, it will take about 50 minutes for the rice to cook completely.). Remove the lid, fluff the rice, scraping the bottom, and then put the lid back on and let it rest for about 10 minutes. Serve and enjoy!

For Arroz Rojo

3 roma tomatoes

¼ inch thick slice of white onion

1 clove garlic with the peel still on

1 teaspoon salt

Roast the tomatoes, onion and garlic clove on a grill, in a broiler, or a griddle on the stove. The tomatoes should be evenly blackened and the onion and garlic cooked until slightly blackened and soft. Peel the skin off the tomatoes and the garlic clove. Place in a blender with two cups of water or stock and follow the above instructions for Arroz Verde.

For Arroz Blanco

¼ inch thick slice of white onion

1 clove of garlic

1 teaspoon salt

3 whole, Serrano chiles

1 sprig epazote

Blend the onion, garlic, and salt with two cups of stock (stock in place of water is more important with white rice for flavor). Follow instructions for Arroz Verde. At the moment when you add the mixed veggies, add the sprig of epazote and the whole chiles.

Monday, May 2, 2011

Recipe: Pasta al ajillo con champiñones


Here in Puebla, it's pretty common to see pasta al ajillo in restaurants, often with an option to add shrimp. I've never seen it with mushrooms though, and one day, Maru and I thought it would be good, and we were right!

This is one of those everyday dishes that will be done in less than 30 minutes. The biggest time sucker is waiting for the water to boil, and you'll most likely finish making the "sauce" before the pasta is done, so you'll have time to throw a salad together if you want.

The name of the dish comes from the guajillo chile, which is a medium-hot dry, smooth-skinned chile. Any dry chile with smooth skin will work (chile de arbol, costeño, cascabel), although many are quite a bit hotter than the guajillo.

This mixture could also be a good base for a stir fry or for a nice piece of fish. This recipe will serve 2 as a main course or 4 as a side dish. It is easily doubled.

Pasta al ajillo con champiñones (Guajillo pasta with mushrooms)

½ lb. dry pasta (spaghetti works well)

3 Tablespoons olive oil

4 cloves garlic, minced (it’s a high garlic to pasta ratio on purpose)

1-2 guajillo chiles, sliced in ¼ inch pieces, seeds removed

1 ½ cups sliced fresh mushrooms

¼ cup chopped fresh parsley

Parmigiano cheese for garnish (optional)

Salt to taste (probably about a teaspoon in total)

Put salted water on to boil for the pasta. Cut up the garlic, chiles, and mushrooms. Heat 2 tablespoons of the oil in a large skillet over medium heat. Add the garlic and sautee for about 1 minute, then add the chiles. Cook, stirring constantly (you do not want burnt garlic!), until the chiles start to turn almost black (not burned, but starting to blacken), which should take about 3 minutes. Add the mushrooms with a dash of salt and cook until they are done, about 5 minutes.

Cook the pasta. Once the pasta is al dente, drain it, and add it to the pan with the mushroom mixture immediately. Stir everything together while keeping the pan over medium heat. Add the remaining tablespoon of oil and another dash of salt and stir until everything is evenly incorporated. Turn off the heat, then mix in the parsely.

Plate and top with grated parmigiano. Enjoy! The chile pieces are totally edible if you have a taste for them, and big enough to avoid if you don’t.

A note on spiciness:

As far as spiciness goes, this dish is probably “medium” or so. For most people, it will have a nice kick, but nothing that can’t be quenched with a cool drink. If you want it hotter, just add more chiles, or leave the seeds in. Obviously, you can add fewer chiles too, but another option would be to leave the chiles whole, sautee them with the garlic, then remove them before cooking the mushrooms. They will infuse the oil with some of their flavor, but very little spiciness. I would only recommend that route if you have almost 0 tolerance for spicy food. The flavor of the chiles is a really important part of this simple dish.

Saturday, April 30, 2011

Recipe: Savory Mango Soup


Had a tough time with this pic. It looked even better in real life!

I know it's been a while, so I am going to reward your patience with an original recipe. How about that? Enjoy!

Ok, I am sure that someone somewhere makes something like this soup, but I have honestly never had it or heard of it. I am going to consider it a personal creation for now. I was literally struck by inspiration one day, and the final product was so delicious, I made it again and am now sharing the recipe with you. As far as soups go, this one is really easy and doesn´t take long to make (as little as 45 minutes if you don´t simmer it too long). Prep time is super fast, probably 5-10 minutes depending on how fast you work a knife. You´ll need a blender (stick blender is convenient but an upright blender works too) and a mesh strainer. We have a big one that cost $2, and it´s perfect for soups.

If you are averse to mango because of it´s texture (like Maru), don’t worry! This soup will leave you with nothing but the delicious tart, tangy, and slightly sweet flavor of a ripening mango. It also feels great on the throat. I think it would be really nice for someone with a sore throat.

While the soup isn’t hard to make, the color is gorgeous, and it could easily be part of an elegant dinner. It´s pretty light, which makes it good to accompany other light, summer fare like veggie dishes, fish, or chicken. But that’s all just suggestion. Do what you will!

Also, I haven´t tried it yet, but I bet this same recipe would work well with tart peaches. I’ll have to try that and get back to you.

About mangoes


These are the mangoes you want.

Mangoes are all over the place in the markets in Mexico right now. The big red, yellow, and green ones are the best for this recipe in my opinion. They are tarter than the little yellow mangos, which makes them great for savory dishes. Plus, for those of you in colder climes (I´m looking at you Michigan people), they are much easier to find. You want to use them for soup when they are still pretty hard, not exactly green, but not exactly ripe and sweet. The fruit should yield slightly when you squeeze it.

Here is a really easy way to clean any mango whether you want to use it for a recipe like this or just eat it:

1. Rinse the fruit under cold water.

2. Stand it up on its end and with a sharp knife, cut just along the large pit (about a ¼ inch off center). Repeat for the other side. Your knife should scrape along the pit as you go so that you get as much fruit off as possible.

3. Using a spoon, scoop the fruit out of its peel in one, large piece.

4. Chop or slice as desired.

5. Remove the peel from around the pit. Cut off any excess fruit or just nibble on it (be ready to floss afterwards!)


Savory Mango Soup

1 Tablespoon veggie oil

1 small onion, chopped

1 carrot, chopped

2-3 cloves garlic, minced

1 Tablespoon ginger, minced

1 roma tomato, chopped

2 large mangos, cleaned and chopped. Reserve the pits. (Best if not quite ripe. See instructions above.)

2 dried chiles de arbol whole, with seeds removed (Any other smooth skin dried chile will work too. You can skip the chile, but it adds a really nice flavor, and if you remove it before blending, you probably won´t even notice the spice.)

½ inch piece of cinnamon, whole

6-8 cups veggie stock, heated (calculate about 1 ½ cups of stock per serving)

1 avocado, chopped

¼ cup chopped fresh parsley

Salt and pepper to taste

Heat the oil in a large pot over medium eat. Add the onion and carrot with a sprinkle of salt. Sautee until the vegetables are beginning to soften, about 5 minutes.

Add the garlic and ginger and sautee until very fragrant, about 2 minutes. Add the tomato and cook for another 5 minutes. (If you have a little white wine on hand, this would be a good time to throw in a ¼ cup or so. Cook until the liquid is almost completely evaporated.)

Add the chiles, cinnamon, and mango. Add another pinch of salt. Stir and cook for about a minute, then pour in the stock. Add the pits to the pot (without the peels!). As they simmer, that extra fruit and juice clinging to them will add its flavor to the soup.

Bring the soup to a boil then lower the heat to a simmer. Cook for at least 20 minutes, preferably about 40 so that the flavors can come together.

Remove the mango pits and the cinnamon stick. If you are concerned about your soup being too spicy, you can also take out the chiles. If you want it to have a little kick, leave them in there.

Using a stick blender or in a regular blender in batches, puree the soup. Taste and adjust seasonings. Pour the soup through a medium mesh strainer. This filtering will remove a fair amount of roughage and leave you with a wonderfully silky soup. Adjust the seasonings on the strained soup one last time, and get ready to serve!

To serve, divide the chopped avocado among six soup bowls. Ladle in the soup, then sprinkle with chopped parsley. Serve immediately.

Wednesday, April 13, 2011

Recipe: Enfrijoladas

I plan on adding more basic recipes (rice is on its way, just needs a little testing), but for now, let´s start looking at ways to use what I just posted on Monday and Tuesday. I also promise to take some pictures soon. I just haven´t made some of this stuff recently. As soon as I take them, I will add them to the posts. After all, you eat with your eyes first! For now...

Now that you know how to make beans, here is a staple of our household. Enfrijoladas (En-free-hoe-lah-dahs) are common all over Mexico. Usually in restaurants, the tortillas are filled with shredded chicken, and the beans are turned into a thick sauce, sometimes with a little aniseed added in. It´s really good that way, but this version is a Bautista (Maru´s family) breakfast, lunch, or dinner special. It´s quick (with the beans already made, it will be ready in about 10 minutes), versatile (you can change the filling to suit your taste, and you can top it with whatever veggies you might have on hand), cheap, and hearty. Two tortillas is usually good for both Maru and me (I usually put more beans on my plate). If you´re a big eater, you could do three or even four. Whatever floats your boat, as they say.

Enfrijoladas (Vegetarian)

(Ingredients listed are for two servings. Increase or decrease at your leisure.)

4 tortillas (corn or flour, your preference)

1 beaten egg

2 cups prepared beans with their broth, heated piping hot

Salt to taste

1 Tablespoon veggie oil (you´ll probably need less than this)

Optional toppings:

  • Diced or shredded cheese (any mild melting cheese is good)
  • Diced tomatoes
  • Sour cream or yogurt
  • Hot sauce or homemade salsa
  • Chopped cilantro
  • Sliced avocado

Heat about a teaspoon of the oil over medium-high heat in a frying pan. Once the oil is hot, begin lightly frying the tortillas one by one for about twenty seconds on each side. They should still be pliable, you´re not making tostadas. Add more oil as needed. (If you want to skip the oil and go for a lower fat version, you can. Just heat up the tortillas until they are soft. The difference is that they will fall apart more once you finish the dish. Frying them gives them a little more body.) Set the fried tortillas aside.

Add a pinch of salt to the egg, and then pour it into the pan and cook yourself a scrambled egg. Divide it into four equal portions. Use the portions to make rolled tacos with your tortillas. Place two tacos in a dish (a large soup bowl works great). Pour about a cup of beans with broth over the tacos. Salt to taste, add desired toppings, and enjoy!

If you want to use cheese, I recommend putting it on top of the tacos before pouring on the beans so that the heat from the beans will melt it.

Tuesday, April 12, 2011

Recipe: Mexican Beans

Frijoles negros

Beans, beans the magical fruit. Many people have written about the health benefits of this near perfect food (fiber, protein, iron, oh my!), so I won´t go into it. Needless to say, you should eat beans! And not out of the can. It is so easy to make your own. With a pressure cooker, you don´t even really need to plan, no soaking or anything. And you need very few ingredients. If you have dried beans in your pantry, you always have a delicious and nutritious meal on hand, and they´re cheap! Probably the biggest bang for your buck in terms of nutrition and filling you up.

You will have to make them a few times in order to perfect the texture but that doesn´t mean your beans won´t be tasty, they just won´t be perfect J (I´m pretty sure that takes a while. I´m still working on it).

Here in Mexico, they say a house is not a home if there are no beans. In Puebla, black beans are the most common (and they are often referred to as frijoles Michigan!), but if you go to the market, you´ll be dazed by the different colors and sizes.

This recipe is of my own creation, incorporating some tips that Maru´s grandmothers have given me as well as some tricks we´ve developed on our own. One classic mistake you do not want to make is over-seasoning. Notice that besides the beans, even if you add in all the optional ingredients, it´s just onions, chile, epazote, and salt. No garlic, no cumin, no pepper, nothing. And if you just want to use onions and salt, your beans will be yummy. The things are bursting with flavor all on their own.

Also, if you are concerned about gas from beans, you can always use Bean-o, but in reality, if beans and other legumes (like lentils) are a regular part of your diet, you won´t notice any discomfort or excess gas, because your body will be used to processing them. So don´t worry about taking them to work for lunch!

Basic Beans (vegan depending on fat or stock used)

2 cups dried beans (black, pinto, whatever your preference)

1 medium white onion, halved

1 sprig fresh epazote (optional)

4-6 cups water

2 Tablespoons vegetable oil (lard is good here too)

1-2 whole dried chiles (optional. Remove the stem and seeds. Pasilla, guajillo or chile de arbol are good.)

Salt to taste

1-2 cups chicken, veggie, or pork stock (optional)

First, you need to get those dried beans cooked. There are a few different ways to do this; in a pot on the stove for hours, in a crockpot, or in a pressure cooker. The latter, obviously, is the fastest way, and in my opinion, gives the best result. Our pressure cooker was left behind in the States, so we´ve been using the crockpot, which works, but the texture of the beans isn´t quite as good. If you are going to just do them in a pot, you will want to soak the beans overnight. For all three versions, rinse the beans well, place them in your pot of choice, cover with enough water or stock for the beans to triple in volume, put the onion and epazote (if using) in the water and cook. Don´t salt the beans for this first step as it may make them tough.

On the stove in a regular pot, covered: Bring to a roiling boil, then lower the heat to a simmer. The beans will take anywhere between 2-4 hours to cook, depending on how fresh they were to begin with.

In a crockpot: Cook them on high for 4-5 hours or on low for 8-10 hours. This is a good way to do them overnight.

In a pressure cooker: Cook them under pressure for 35-45 minutes.

However you first cook your beans, you can taste them to see if they are done. Also, when you spoon out a couple and blow on them, the skin should split. Perfectly cooked beans should be soft but not mushy.

To finish the beans after they are cooked, thinly slice the other half of the onion. Heat the oil over medium heat in another pot large enough to hold the beans with water (a cazuela is perfect for this). Sautee the onions until they are beginning to soften and brown, about 5-7 minutes. If you want to use chiles, now is also the time to add them. Add about half a teaspoon of salt to the chiles and onion. Continue cooking and stirring as the onions brown (if a couple blacken, that´s ok. This is a dish where that is a nice flavor.). The chile will become very fragrant and blacken just slightly.

Here is the secret to a delicious finished bean broth. As your onions sautee (or before you start cooking them if you prefer to avoid multitasking in the kitchen), remove the other onion half and the epazote from the cooked beans. Remove the epazote leaves from the woody stem and discard the stem. Place the onion and the leaves in a blender with about a cup of the bean water and a half teaspoon of salt. Blend until smooth then add the mixture back to the beans. (Note: I have also been known to cook a dried chile with the beans and blend it up too. It´s nice and makes the final broth spicy.)

Once your sautéed onions and chile are ready, dump the beans and their water into the pot and stir to combine. Add another half teaspoon of salt and if you wish, now is a good time to add some stock. On its own, the bean broth will have a lot of flavor, but you can make it even richer with a nice homemade stock. It also depends on how watery you want them. Some people like a lot of broth. You need to have enough liquid for them to be covered, but beyond that, it´s your preference. Simmer this final mixture for at least 10 minutes and up to 30. The flavors will develop nicely. Taste and adjust seasonings as needed.

Your beans are now ready to be enjoyed as is, as a side, for enfrijoladas, or however you like them. The beans are best the first and second day, but are good in your fridge for up to a week. Once they´ve been refrigerated for a few days, then you can consider making refried beans. Refried beans are supposed to be made with older cooked beans. It´s a way to bring them back to life.

Refried beans: Heat 1-2 tablespoons of veggie oil in a pan over medium-high heat. Sautee a little onion (depends on how many beans you have left, you don´t want it to be too oniony) and a fresh, diced chile (jalapeño or Serrano). Add the beans to the pan with just some of their broth. Cook until hot, then start mashing them with a potato masher. Add more of the broth as they soak up the juice and until you get the consistency you want (again, personal preference dictates how liquidy you want your refried beans). Salt to taste, and you´re done. Takes about 10 or 15 minutes to make refried beans. Now they´ll be good in your fridge for another 3 or 4 days.

Go forth and make beans! Seriously.

Monday, April 11, 2011

Recipe: Salsa Verde

It´s time for some Mexican basics. This week and next, I want to share some simple, everyday Mexican recipes so that anyone who wants can start getting to know this wonderful and versatile cuisine for what it really is (hint: it´s a lot more than just tacos and burritos, and there´s not really any ground beef involved.) So here comes basic recipe #1, one of Maru´s favorites: Salsa Verde.

Go to any restaurant in this part of Mexico and you´ll usually get two little bowls of salsa, one green, one red. Depending on the establishment, the specifics of the salsa (the chiles used, roasted or not, etc.) will vary, but those are the colors. The green is made with a base of tomatillos, which look like little green tomatoes in a husk. Over the past few years, they have become readily available all over the US. I think even Glen´s in Grayling has them.

The recipe here is for a basic and versatile green salsa. It can be used just to dip, for enchiladas, chilaquiles, or whatever else you can think of. There is almost no chopping, and from start to finish, it will be done in about 20 minutes, super easy. It is great when it´s fresh, but making it a day ahead is also not a problem.

For a more rustic version, you can skip the blender or food processor and use a molcajete or large mortar and pestle to smash everything together.

Salsa Verde (makes about ½ liter of salsa, easily doubled) Vegan

1lb tomatillos (or ½ kilo)

¼ of a medium white onion

1-2 cloves of garlic still in their paper

1-3 serrano chiles (If you are worried about spiciness, you can also use a jalapeño, which is a little milder. This salsa is supposed to be on the spicier side, but make it how you want it!)

2/3 cup, chopped, loosely packed cilantro (including tender stems)

½ teaspoon salt or to taste

First, remove the papery husks from the tomatillos and rinse off the sticky coating they have.

There are two basic ways to begin this sauce, both are tasty, but the flavors will be different. The more traditional way is to place the tomatillos and chiles in a pot of water, bring them to a boil, and cook them for 3-5 minutes, until the tomatillos are soft. The onion and garlic should be roasted. Place them in a dry, non-stick pan over medium-high heat or on a regular pan coated with tin foil. Turn them so they roast and brown evenly.

The second way is to grill or broil the tomatillos, chiles, onion, and garlic. Whether on the grill or in the broiler, you want everything to blacken evenly. This method will give the sauce a smokier, deeper flavor. It´s my favorite version of the two.

However you cooked the tomatillos and chiles, now you just need to blend! If you want a milder salsa, remove the seeds from your chiles. Remove the garlic from it´s paper. If you grilled the tomatillos, you do not have to peel the blackened skin off. It´s a big part of the flavor. Place all the cooked veggies in a blender or food processor and blend until smooth. Add the salt and the cilantro and blend until everything is incorporated. Be careful of the blender top popping off if the salsa is hot!

Taste your salsa to see if it needs more cilantro or more salt. Remember that while the temperature of the salsa is hot, it will taste spicier. Once it cools down, the spiciness will mellow out. Sometimes, depending on the tomatillos, the finished product will be a little too acidic. You can add a teaspoon or two of sugar to offset the acid. Again, it will mellow with a little time.

The salsa is best used right away, but it will still be good in your fridge for about a week. Don´t worry if it is kind of like jelly after a day or two in the fridge. That´s just the tomatillos setting up. Once you reheat the salsa (in the microwave or on the stove), it will be back to a smooth consistency.

Enjoy! More recipes using this one to come soon...