Search This Blog

Showing posts with label Mexican. Show all posts

Thursday, November 3, 2011

Recipe: Calabacitas Rellenas con Molito de Jitomate Asado

Maru’s maternal grandma, abuelita Chela, came up with this recipe while she was raising seven kids. She’s full of great vegetarian recipes, since meat would have been costly for her large family. This recipe is simple, but it will be a bit time consuming as many of these older Mexican recipes are. I would not consider this dish an everyday, after work type thing for your average working family. Chela often did it that way and wouldn’t consider it anything fancy, but those were different times with pretty obnoxious expectations placed on housewives. You have got to respect the amount of work that women would put into daily meals and make it look like any old day.

You’ll see in this dish what has become a regular practice in the Mexican kitchen, dredging things in beaten egg whites and frying them. Someone figured this technique out at some point, realized it was delicious, and now it’s the go-to method for all sorts of things. Usually, it’s how you do chiles rellenos. When you get to the part where you have to dredge the zucchini through the egg whites, don’t worry about it being perfect. It kind of just works out.

I had never actually made this before, but a series of facts led me down this road tonight; Maru had just purchased a big bunch of epazote, I found a 2 lb bag of bruised tomatoes at the store for $1, and I found this beautiful fresh cheese that is targeted at an Eastern European audience, which was obvious from the Slavic on the label and the poorly translated ingredient list. (We have an incredible amount of Eastern European goods available in our neighborhood. Lots of Poles and Ukrainians.)

I took creative license with Chela’s recipe by roasting the tomatoes, but I think she would approve. The sauce was one of the most delicious things I’ve made in a while. Normally, you would use Mexican calabacitas for this recipe, but you can’t always find them. They are basically a small variety of zucchini with a very thin, light-colored skin, and they are less watery than the regular dark-skinned zucchinis we’re used to. I just bought small regular zucchinis and peeled strips of their skin off to avoid some of the toughness. They came out perfectly.

So, if you are feeling up to it, I highly recommend these. You will not be disappointed!

Calabacitas rellenas con molito de jitomate asado

2 small zucchinis (or 4 Mexican calabacitas)

¼ lb. or so queso fresco (Basically, you want a fresh cheese that is a little harder than fresh mozzarella, although that would work well too. You should be able to find queso fresco in round wheels in most stores that carry Mexican products.)

½ cup white flour with ¼ teaspoon salt mixed in

3 egg whites

Oil for frying

For the sauce:

2 lbs fresh tomatoes

½ cup thinly sliced onion

1 dried chipotle diced into small pieces (another dried chile would also work, but I like the smoky chipotle)

2 sprigs fresh epazote

½ teaspoon salt

2 Tablespoons veggie oil

1. Heat your oven’s broiler. Wash the tomatoes and put them into a 9x13 glass baking dish. Place them under the broiler. Check them and rotate them every few minutes. They should roast until they are starting to blacken all over, about 10-15 minutes. Remove them from the oven and let them cool slightly. Once cool enough to touch, remove and discard the blackened skins.

2. While the tomatoes are cooking, make the calabacitas. Slice the zucchini in ¼ inch thick rounds. Slice the cheese in ¼ inch thick squares. Make little sandwiches with a slice of cheese between two slices of zucchini.

3. In a frying pan, heat a ½ inch of oil over medium-high heat.

4. Put the egg whites in a large bowl. Beat the egg whites with an electric beater until soft peaks form. (You can do it by hand, but it’s a workout!)

5. Working in batches, roll each zucchini “sandwich” in the salted flour (this helps the egg stick and seasons it), and then dredge it through the beaten egg white. You can do this with your fingers. The coating won’t be even, but that’s ok. As you remove the zucchinis from the egg, gently place them in the oil. Fry for about 1-2 minutes on each side or until golden brown. Remove to a paper towel-lined plate or cookie sheet.

6. In a large sauce pan, heat the 2 Tablespoons of veggie oil over medium heat. Throw in the onions with a pinch of salt. Cook until starting to soften, about 3 minutes.

7. Add the chipotle and cook for another 3-4 minutes until the onions are just starting to brown and the chile becomes very fragrant.

8. Dump in the tomatoes. You can toss them in whole, and they will break down quickly. Make sure that you pour in all of the juices that will have collected at the bottom of your baking dish.

9. Add another ½ teaspoon of salt and the epazote sprigs. Bring the mixture to a boil, and then simmer for 15-20 minutes.

10. Remove the sauce from the heat. Using a potato masher, crush any remaining chunks of tomato and blend the ingredients together. You could also blend everything with a blender, but I liked how this came out by hand.

11. Strain the sauce. The easiest way to do this is to dump it into a large bowl, then place a medium mesh strainer over the pan you cooked it in and pour the sauce through the strainer. Using a rubber spatula, scrape the sauce down and around the strainer until you’re left with nothing but almost dry pieces of tomato, seeds, herb, and onion. Now you should have a beautiful, silky smooth, smoky-sweet sauce.

12. To serve, place a few zucchinis on a plate, spoon the sauce over the top, and if you want, add a dollop of yogurt or sour cream. Black beans go really well with this dish, and if you have fresh tortillas, even better.

Thursday, May 26, 2011

Food Ideas: Desayuno Mexicano - Mexican Breakfast

Huevos a la mexicana con frijoles

I love breakfast food. Perfectly crispy hashbrowns, smoky bacon, fresh eggs… mmm. Or French toast or pancakes with maple syrup, also mmm… While I sometimes have a hankering for an American breakfast that I can only satisfy at home here in Puebla (restaurants here just don’t do hashbrowns, French toast, or pancakes well at all), I LOVE a good Mexican breakfast. Breakfast dishes here in central Mexico are essentially a dozen different ways to combine eggs, tortillas, and salsas with a side of delicious beans.

You don’t really need a recipe for most of these, so what I figured I would do is run through a list of some of my favorites just to give you ideas for a weekend breakfast or even a midnight snack. If you have some salsa on hand (hopefully that you made yourself!), eggs, and tortillas (corn or flour), you’re already more than halfway there. Be aware that the amount of salsa in a Mexican breakfast can be high. Even if you keep it mild, it’s still a lot of acid. Can be a bit much if you’re not used to it, but once you get used to it, you will crave it in the morning. So here it goes. Pick your favorite, put your spin on it, make sure you have some beans on the side, and enjoy!

Here are a few different versions of scrambled eggs:

Huevos a la mexicana: These are scrambled eggs with tomato, onion, and chile (usually Serrano or jalapeño) to reflect the colors of the Mexican flag. Restaurants sometimes just toss some pico de gallo in scrambled eggs and call it good. I prefer the way my mother-in-law makes them (she doesn’t cook much, but her huevos a la mexicana are perfect). Basically, the key is to cook the tomato like crazy and use a fair amount, one roma tomato per egg. Heat some oil, add the chopped tomato with a little onion, and sautee it over medium-high heat for 5-10 minutes, or until the tomato starts to brown. Add as much or as little diced chile as you like, cook for a minute, then add your beaten eggs and cook however you like ‘em. With the tomatoes almost caramelized, you end up with sweet and spicy. Perfect.

Huevos con tocino, jamón o chorizo: Fry up either a little chopped bacon, ham, or chorizo, then throw your beaten egg in and scramble. Great on a warm flour tortilla with a little Tabasco sauce.

Huevos al albañil: Heat up either green or red salsa, scramble your eggs, then dump them into the hot salsa. They should be thoroughly bathed in the salsa.

Here are a few different versions of eggs sunny-side up or over-easy:

Huevos rancheros: Red salsa is the most traditional for this, but if you have green, go for it. Heat a little oil in a pan, quickly fry two tortillas (corn or flour), set them aside, and then cook your eggs as desired. Place one egg on top of each tortilla, then pour warmed salsa over the top. If you have it, add a little shredded cheese or cream. You can also add a slice of ham in between the tortilla and the egg. Classic.

Huevos divorciados: You need green and red salsa for this one. Basically, make huevos rancheros, but bathe one egg in green and the other in red. Makes for a slick presentation.

Huevo estrellado: If you’re not in the mood for a lot of salsa, just fry up your tortilla(s) and put your fried egg on top. It’s a nice alternative to toast.

And one of my all-time favorites at home or at a restaurant…

Chilaquiles: For chilaquiles, you need a far amount of either red or green salsa, and you need to make your own tortilla chips from corn tortillas (If you buy them, make sure they are chips made from actual tortillas and not flavored in any way. This dish won’t work with your run-of-the-mill commercial tortilla chips. They would fall apart and be too salty.). It’s really easy and a great use of stale tortillas. Cut them into little triangles (8 per tortilla) and fry them in batches in hot oil, draining them on paper as you remove them. Once your chips are ready, slice a little onion (1/4 of an onion or so), heat a tablespoon of oil in a large frying pan, fry the onion for a couple minutes, then dump in the salsa. Heat the salsa for a couple minutes, then add the chips to the pan and toss to coat. Once they are evenly coated and just starting to become a little more pliable, take them off the heat, plat them, and top with shredded cheese (cotija is excellent), sour cream, raw onion if you like, and avocado if you have it on hand. To really send this dish over the top, you can add a protein, like shredded chicken, a couple of fried eggs, or even a piece of skirt steak. Yeah, that's good.

Monday, May 9, 2011

Recipe: Arroz Verde


Arroz verde con plátanos fritos

I remember when my siblings and I were little, my mom used to do Spanish Rice every once in a while from a mix. We loved it at the time, then when I got older, I started to think it was just kind of tasteless. You know that red rice you get at “Mexican” restaurants in the US? It’s kind of mushy and has almost no flavor. I just always think, “Why did you bother putting this on my plate?”

This rice is the real deal. Its fluffy, slightly al dente texture is great, and the flavor is delicious, but understated enough to quickly become a comfort food. It’s also very versatile as far as serving goes. As a side dish, it can accompany just about anything, and you can also serve it as a course all its own or even make a complete meal out of it (as we just did!).

Popular ways to serve Mexican rice is with sliced bananas (fried or raw), a fried egg on top, or with a spoonful of beans. There are many possibilities.

Here is the recipe for our house favorite, green rice. At the end of the recipe you’ll find how to make red or white rice as well. Mexican rice is basically a pilaf with the rice grains being fried before steaming them. What varies with each color is what you mix into the cooking liquid.

I will be honest and let you know that you probably won’t get perfect rice the first few times you make this dish. It’s tricky to get the texture just right, but if you follow these steps, you should be good to go. Just don’t be dissuaded if your rice ends up a little over or underdone. Try, try again. It is well worth it. Once you get the hang of making Mexican rice, it will be a meal that you can prepare very quickly. It’s also cheap, delicious, and nutritious (especially if you opt for brown rice).

Arroz Verde

2 poblano chiles

2 Tablespoons chopped onion

1 clove garlic, peeled

¼ c loosely packed fresh epazote (You can skip the epazote, or use cilantro. Either way will change the flavor significantly.)

1 teaspoon salt

2 c stock or water (Veggie or chicken stock adds a nice flavor to the rice, especially if it is homemade, but you can get delicious rice just with water.)

2 Tablespoons veggie oil

1 c medium grain rice (White or brown is fine. See below for cooking difference for brown rice. Note that brown rice will give a very different texture and a nuttier flavor.)

½ c mixed vegetables (Diced carrot, corn, diced potato, and/or peas are most common. Carrots or potatoes should be cut to the size of a grain of corn.)

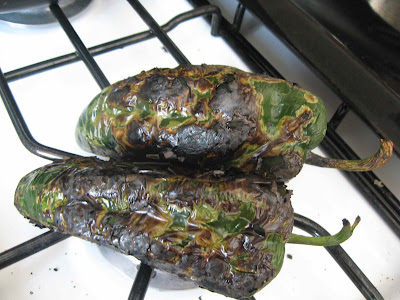
With a grill, broiler, griddle, or flame of a gas range, roast the poblanos until blackened evenly all over. Wrap them in a clean towel or place them in a paper bag to sweat for 15 minutes. This “sweating” will make them easier to peel. Remove the stems, seeds, and blackened skin from the chiles and place them in a blender.

These chiles are properly roasted!

To the blender add the onion, garlic, epazote, salt, and stock or water. Blend until everything is well liquefied and well combined.

In a medium sauce pan over medium high heat, warm the oil. When hot, add the rice. Fry for about 3-5 minutes, stirring constantly until the rice grains go from translucent to opaque and give off a nutty aroma (Brown rice will pop a little like popcorn!).

This rice is fried and ready for the liquid.

Add the liquid mixture all at once. It will spit and bubble furiously for about 5 seconds then calm down. Be careful. Add the mixed vegetables. Stir everything together.

Bring the rice to a boil, then cover and turn the heat down to low. Simmer the rice for about 20 minutes (If you are using brown rice, it will take about 50 minutes for the rice to cook completely.). Remove the lid, fluff the rice, scraping the bottom, and then put the lid back on and let it rest for about 10 minutes. Serve and enjoy!

For Arroz Rojo

3 roma tomatoes

¼ inch thick slice of white onion

1 clove garlic with the peel still on

1 teaspoon salt

Roast the tomatoes, onion and garlic clove on a grill, in a broiler, or a griddle on the stove. The tomatoes should be evenly blackened and the onion and garlic cooked until slightly blackened and soft. Peel the skin off the tomatoes and the garlic clove. Place in a blender with two cups of water or stock and follow the above instructions for Arroz Verde.

For Arroz Blanco

¼ inch thick slice of white onion

1 clove of garlic

1 teaspoon salt

3 whole, Serrano chiles

1 sprig epazote

Blend the onion, garlic, and salt with two cups of stock (stock in place of water is more important with white rice for flavor). Follow instructions for Arroz Verde. At the moment when you add the mixed veggies, add the sprig of epazote and the whole chiles.

Monday, May 2, 2011

Recipe: Pasta al ajillo con champiñones


Here in Puebla, it's pretty common to see pasta al ajillo in restaurants, often with an option to add shrimp. I've never seen it with mushrooms though, and one day, Maru and I thought it would be good, and we were right!

This is one of those everyday dishes that will be done in less than 30 minutes. The biggest time sucker is waiting for the water to boil, and you'll most likely finish making the "sauce" before the pasta is done, so you'll have time to throw a salad together if you want.

The name of the dish comes from the guajillo chile, which is a medium-hot dry, smooth-skinned chile. Any dry chile with smooth skin will work (chile de arbol, costeño, cascabel), although many are quite a bit hotter than the guajillo.

This mixture could also be a good base for a stir fry or for a nice piece of fish. This recipe will serve 2 as a main course or 4 as a side dish. It is easily doubled.

Pasta al ajillo con champiñones (Guajillo pasta with mushrooms)

½ lb. dry pasta (spaghetti works well)

3 Tablespoons olive oil

4 cloves garlic, minced (it’s a high garlic to pasta ratio on purpose)

1-2 guajillo chiles, sliced in ¼ inch pieces, seeds removed

1 ½ cups sliced fresh mushrooms

¼ cup chopped fresh parsley

Parmigiano cheese for garnish (optional)

Salt to taste (probably about a teaspoon in total)

Put salted water on to boil for the pasta. Cut up the garlic, chiles, and mushrooms. Heat 2 tablespoons of the oil in a large skillet over medium heat. Add the garlic and sautee for about 1 minute, then add the chiles. Cook, stirring constantly (you do not want burnt garlic!), until the chiles start to turn almost black (not burned, but starting to blacken), which should take about 3 minutes. Add the mushrooms with a dash of salt and cook until they are done, about 5 minutes.

Cook the pasta. Once the pasta is al dente, drain it, and add it to the pan with the mushroom mixture immediately. Stir everything together while keeping the pan over medium heat. Add the remaining tablespoon of oil and another dash of salt and stir until everything is evenly incorporated. Turn off the heat, then mix in the parsely.

Plate and top with grated parmigiano. Enjoy! The chile pieces are totally edible if you have a taste for them, and big enough to avoid if you don’t.

A note on spiciness:

As far as spiciness goes, this dish is probably “medium” or so. For most people, it will have a nice kick, but nothing that can’t be quenched with a cool drink. If you want it hotter, just add more chiles, or leave the seeds in. Obviously, you can add fewer chiles too, but another option would be to leave the chiles whole, sautee them with the garlic, then remove them before cooking the mushrooms. They will infuse the oil with some of their flavor, but very little spiciness. I would only recommend that route if you have almost 0 tolerance for spicy food. The flavor of the chiles is a really important part of this simple dish.

Wednesday, April 13, 2011

Recipe: Enfrijoladas

I plan on adding more basic recipes (rice is on its way, just needs a little testing), but for now, let´s start looking at ways to use what I just posted on Monday and Tuesday. I also promise to take some pictures soon. I just haven´t made some of this stuff recently. As soon as I take them, I will add them to the posts. After all, you eat with your eyes first! For now...

Now that you know how to make beans, here is a staple of our household. Enfrijoladas (En-free-hoe-lah-dahs) are common all over Mexico. Usually in restaurants, the tortillas are filled with shredded chicken, and the beans are turned into a thick sauce, sometimes with a little aniseed added in. It´s really good that way, but this version is a Bautista (Maru´s family) breakfast, lunch, or dinner special. It´s quick (with the beans already made, it will be ready in about 10 minutes), versatile (you can change the filling to suit your taste, and you can top it with whatever veggies you might have on hand), cheap, and hearty. Two tortillas is usually good for both Maru and me (I usually put more beans on my plate). If you´re a big eater, you could do three or even four. Whatever floats your boat, as they say.

Enfrijoladas (Vegetarian)

(Ingredients listed are for two servings. Increase or decrease at your leisure.)

4 tortillas (corn or flour, your preference)

1 beaten egg

2 cups prepared beans with their broth, heated piping hot

Salt to taste

1 Tablespoon veggie oil (you´ll probably need less than this)

Optional toppings:

  • Diced or shredded cheese (any mild melting cheese is good)
  • Diced tomatoes
  • Sour cream or yogurt
  • Hot sauce or homemade salsa
  • Chopped cilantro
  • Sliced avocado

Heat about a teaspoon of the oil over medium-high heat in a frying pan. Once the oil is hot, begin lightly frying the tortillas one by one for about twenty seconds on each side. They should still be pliable, you´re not making tostadas. Add more oil as needed. (If you want to skip the oil and go for a lower fat version, you can. Just heat up the tortillas until they are soft. The difference is that they will fall apart more once you finish the dish. Frying them gives them a little more body.) Set the fried tortillas aside.

Add a pinch of salt to the egg, and then pour it into the pan and cook yourself a scrambled egg. Divide it into four equal portions. Use the portions to make rolled tacos with your tortillas. Place two tacos in a dish (a large soup bowl works great). Pour about a cup of beans with broth over the tacos. Salt to taste, add desired toppings, and enjoy!

If you want to use cheese, I recommend putting it on top of the tacos before pouring on the beans so that the heat from the beans will melt it.

Tuesday, April 12, 2011

Recipe: Mexican Beans

Frijoles negros

Beans, beans the magical fruit. Many people have written about the health benefits of this near perfect food (fiber, protein, iron, oh my!), so I won´t go into it. Needless to say, you should eat beans! And not out of the can. It is so easy to make your own. With a pressure cooker, you don´t even really need to plan, no soaking or anything. And you need very few ingredients. If you have dried beans in your pantry, you always have a delicious and nutritious meal on hand, and they´re cheap! Probably the biggest bang for your buck in terms of nutrition and filling you up.

You will have to make them a few times in order to perfect the texture but that doesn´t mean your beans won´t be tasty, they just won´t be perfect J (I´m pretty sure that takes a while. I´m still working on it).

Here in Mexico, they say a house is not a home if there are no beans. In Puebla, black beans are the most common (and they are often referred to as frijoles Michigan!), but if you go to the market, you´ll be dazed by the different colors and sizes.

This recipe is of my own creation, incorporating some tips that Maru´s grandmothers have given me as well as some tricks we´ve developed on our own. One classic mistake you do not want to make is over-seasoning. Notice that besides the beans, even if you add in all the optional ingredients, it´s just onions, chile, epazote, and salt. No garlic, no cumin, no pepper, nothing. And if you just want to use onions and salt, your beans will be yummy. The things are bursting with flavor all on their own.

Also, if you are concerned about gas from beans, you can always use Bean-o, but in reality, if beans and other legumes (like lentils) are a regular part of your diet, you won´t notice any discomfort or excess gas, because your body will be used to processing them. So don´t worry about taking them to work for lunch!

Basic Beans (vegan depending on fat or stock used)

2 cups dried beans (black, pinto, whatever your preference)

1 medium white onion, halved

1 sprig fresh epazote (optional)

4-6 cups water

2 Tablespoons vegetable oil (lard is good here too)

1-2 whole dried chiles (optional. Remove the stem and seeds. Pasilla, guajillo or chile de arbol are good.)

Salt to taste

1-2 cups chicken, veggie, or pork stock (optional)

First, you need to get those dried beans cooked. There are a few different ways to do this; in a pot on the stove for hours, in a crockpot, or in a pressure cooker. The latter, obviously, is the fastest way, and in my opinion, gives the best result. Our pressure cooker was left behind in the States, so we´ve been using the crockpot, which works, but the texture of the beans isn´t quite as good. If you are going to just do them in a pot, you will want to soak the beans overnight. For all three versions, rinse the beans well, place them in your pot of choice, cover with enough water or stock for the beans to triple in volume, put the onion and epazote (if using) in the water and cook. Don´t salt the beans for this first step as it may make them tough.

On the stove in a regular pot, covered: Bring to a roiling boil, then lower the heat to a simmer. The beans will take anywhere between 2-4 hours to cook, depending on how fresh they were to begin with.

In a crockpot: Cook them on high for 4-5 hours or on low for 8-10 hours. This is a good way to do them overnight.

In a pressure cooker: Cook them under pressure for 35-45 minutes.

However you first cook your beans, you can taste them to see if they are done. Also, when you spoon out a couple and blow on them, the skin should split. Perfectly cooked beans should be soft but not mushy.

To finish the beans after they are cooked, thinly slice the other half of the onion. Heat the oil over medium heat in another pot large enough to hold the beans with water (a cazuela is perfect for this). Sautee the onions until they are beginning to soften and brown, about 5-7 minutes. If you want to use chiles, now is also the time to add them. Add about half a teaspoon of salt to the chiles and onion. Continue cooking and stirring as the onions brown (if a couple blacken, that´s ok. This is a dish where that is a nice flavor.). The chile will become very fragrant and blacken just slightly.

Here is the secret to a delicious finished bean broth. As your onions sautee (or before you start cooking them if you prefer to avoid multitasking in the kitchen), remove the other onion half and the epazote from the cooked beans. Remove the epazote leaves from the woody stem and discard the stem. Place the onion and the leaves in a blender with about a cup of the bean water and a half teaspoon of salt. Blend until smooth then add the mixture back to the beans. (Note: I have also been known to cook a dried chile with the beans and blend it up too. It´s nice and makes the final broth spicy.)

Once your sautéed onions and chile are ready, dump the beans and their water into the pot and stir to combine. Add another half teaspoon of salt and if you wish, now is a good time to add some stock. On its own, the bean broth will have a lot of flavor, but you can make it even richer with a nice homemade stock. It also depends on how watery you want them. Some people like a lot of broth. You need to have enough liquid for them to be covered, but beyond that, it´s your preference. Simmer this final mixture for at least 10 minutes and up to 30. The flavors will develop nicely. Taste and adjust seasonings as needed.

Your beans are now ready to be enjoyed as is, as a side, for enfrijoladas, or however you like them. The beans are best the first and second day, but are good in your fridge for up to a week. Once they´ve been refrigerated for a few days, then you can consider making refried beans. Refried beans are supposed to be made with older cooked beans. It´s a way to bring them back to life.

Refried beans: Heat 1-2 tablespoons of veggie oil in a pan over medium-high heat. Sautee a little onion (depends on how many beans you have left, you don´t want it to be too oniony) and a fresh, diced chile (jalapeño or Serrano). Add the beans to the pan with just some of their broth. Cook until hot, then start mashing them with a potato masher. Add more of the broth as they soak up the juice and until you get the consistency you want (again, personal preference dictates how liquidy you want your refried beans). Salt to taste, and you´re done. Takes about 10 or 15 minutes to make refried beans. Now they´ll be good in your fridge for another 3 or 4 days.

Go forth and make beans! Seriously.

Monday, April 11, 2011

Recipe: Salsa Verde

It´s time for some Mexican basics. This week and next, I want to share some simple, everyday Mexican recipes so that anyone who wants can start getting to know this wonderful and versatile cuisine for what it really is (hint: it´s a lot more than just tacos and burritos, and there´s not really any ground beef involved.) So here comes basic recipe #1, one of Maru´s favorites: Salsa Verde.

Go to any restaurant in this part of Mexico and you´ll usually get two little bowls of salsa, one green, one red. Depending on the establishment, the specifics of the salsa (the chiles used, roasted or not, etc.) will vary, but those are the colors. The green is made with a base of tomatillos, which look like little green tomatoes in a husk. Over the past few years, they have become readily available all over the US. I think even Glen´s in Grayling has them.

The recipe here is for a basic and versatile green salsa. It can be used just to dip, for enchiladas, chilaquiles, or whatever else you can think of. There is almost no chopping, and from start to finish, it will be done in about 20 minutes, super easy. It is great when it´s fresh, but making it a day ahead is also not a problem.

For a more rustic version, you can skip the blender or food processor and use a molcajete or large mortar and pestle to smash everything together.

Salsa Verde (makes about ½ liter of salsa, easily doubled) Vegan

1lb tomatillos (or ½ kilo)

¼ of a medium white onion

1-2 cloves of garlic still in their paper

1-3 serrano chiles (If you are worried about spiciness, you can also use a jalapeño, which is a little milder. This salsa is supposed to be on the spicier side, but make it how you want it!)

2/3 cup, chopped, loosely packed cilantro (including tender stems)

½ teaspoon salt or to taste

First, remove the papery husks from the tomatillos and rinse off the sticky coating they have.

There are two basic ways to begin this sauce, both are tasty, but the flavors will be different. The more traditional way is to place the tomatillos and chiles in a pot of water, bring them to a boil, and cook them for 3-5 minutes, until the tomatillos are soft. The onion and garlic should be roasted. Place them in a dry, non-stick pan over medium-high heat or on a regular pan coated with tin foil. Turn them so they roast and brown evenly.

The second way is to grill or broil the tomatillos, chiles, onion, and garlic. Whether on the grill or in the broiler, you want everything to blacken evenly. This method will give the sauce a smokier, deeper flavor. It´s my favorite version of the two.

However you cooked the tomatillos and chiles, now you just need to blend! If you want a milder salsa, remove the seeds from your chiles. Remove the garlic from it´s paper. If you grilled the tomatillos, you do not have to peel the blackened skin off. It´s a big part of the flavor. Place all the cooked veggies in a blender or food processor and blend until smooth. Add the salt and the cilantro and blend until everything is incorporated. Be careful of the blender top popping off if the salsa is hot!

Taste your salsa to see if it needs more cilantro or more salt. Remember that while the temperature of the salsa is hot, it will taste spicier. Once it cools down, the spiciness will mellow out. Sometimes, depending on the tomatillos, the finished product will be a little too acidic. You can add a teaspoon or two of sugar to offset the acid. Again, it will mellow with a little time.

The salsa is best used right away, but it will still be good in your fridge for about a week. Don´t worry if it is kind of like jelly after a day or two in the fridge. That´s just the tomatillos setting up. Once you reheat the salsa (in the microwave or on the stove), it will be back to a smooth consistency.

Enjoy! More recipes using this one to come soon...

Saturday, April 2, 2011

Recipe: Mole Poblano

Finished mole

During our trip to Oaxaca last year, I fell in love with Oaxacan black mole. We purchased the unique dried chiles from that region that give it such a distinctive flavor. They are called chihuacles, and it wasn´t until we got back that I discovered how truly particular they are to the region and hard to find elsewhere. Had I known, I would have stocked up. They have an incredible aroma. Anyway, I took advantage of having procured them and dug into the Rick Bayless recipe for mole negro . The final product was a smashing success. I didn´t quite get the dark black color, but the flavor was indisputable. Then, I decided that I had to do some justice to Puebla and make mole poblano the next time I was up to it. Plus, mole poblano usually has peanuts in it, so I can´t eat it without getting a little sick due to allergies. My version eliminates the culprit!

So recently, in honor of celebrating and thanking the team I worked with as director of the high school in Colegio Ypsilanti, I set out to make mole poblano. I have a great cookbook from Willams Sonoma called Savoring Mexico with very reliable, authentic recipes. The only mole recipe in there, however, is from Querétaro, a state north of Mexico City. It is very similar to mole poblano, but there are some slight differences, so I conferenced with Maru´s grandma and confirmed the ingredients and some of the steps. At the end of the whole process, my mole still needs to be perfected, but we couldn´t argue with the yummy results.

Here I have posted the recipe as I did it. Mole is a little daunting to make (and eat for some people!), but if you have some experience in the kitchen and are comfortable with a recipe that involves lots of steps, you can definitely do it. As far as ingredients go, the one thing you´ll really have to hunt for in the states are the dried chiles. Here, the markets have them in huge mountains. I think we spent like 30 pesos for all of the chiles in the recipe. They only come in little bags in the US and are more expensive, but it´s worth it. The recipe yields a huge pot of sauce, so you´ll have leftovers that you can easily give away or freeze for up to several months. Definitely make the mole a day or two in advance so that you get the hard work out of the way, and you also give the flavors time to develop.

If you are going to do this recipe, make sure you have a few hours to work with, and a friend or two to help in key parts isn´t a bad idea either! Cleaning the chiles is time consuming, and processing everything in the blender or with a stick blender can be quite the juggling act. Read the recipe a few times and make sure you have everything you need on hand. And let me know if you follow this recipe. I would really like to know how it turned out!

Mole “Poblano”

The Ingredients:

  • 1 whole chicken cut into eight parts for serving (2 legs, 2 thighs, and the breast in four pieces, all still on the bone). The back, neck, head, wings, and feet should also be used for the stock, see next ingredient.
  • 6-8 cups homemade chicken stock. If you are going to make mole, do not do yourself the disservice of using canned stock or bouillon. Make it!
  • Place all of the extra chicken parts in a large pot with 1 onion quartered, 5 whole cloves of garlic, 2 medium carrots cut in half, two bay leaves, and about 1t salt. Cover with cold water, bring to a simmer, and cook, partially covered for at least 1 hour and up to 2. Skim off the foam and fat as it rises to the surface. Do not stir and do not boil. After the cook time, pour the stock through a mesh strainer and discard the bones and veggies. Skim excess fat off the top of the stock and set aside.
  • 12 ancho chiles
  • 12 pasilla chiles
  • 12 mulatto chiles (there should be an equal amount of each chile. If you have a scale, you can weigh them as sometimes the size can vary quite a bit.)
  • ½ cup plus 2 Tablespoons sesame seeds
  • ½ cup fresh, flavorful lard (if you can get fresh lard from a butcher, this is the recipe to do it for. Lard has a bad reputation that it doesn´t entirely deserve and the flavor really adds to the richness of the mole. If you can´t get lard or just don´t want to use it, vegetable oil is fine.)
  • ½ lb tomatillos, husked, rinsed, and quartered
  • 1 medium white onion, chopped
  • 2 cloves garlic, minced
  • ½ teaspoons aniseeds
  • ¼ teaspoons ground cumin
  • 1 bay leaf
  • 1 day-old corn tortilla
  • 1 chunk or slice of day old white bread (baguette or Italian loaf is good)
  • 40 raw almonds
  • 4 T raisins
  • ½ inch piece of true cinnamon (not cassia, which is the Asian stuff)
  • 3 whole cloves
  • 1 disk Mexican chocolate, about 1.5 oz (You can find brand name stuff - Abuelita, Ibarra - in most US grocery stores. They are ok, but full of artificial flavors. I would also recommend just using some good, bittersweet chocolate. If you do that, just add a little more sugar. Mexican chocolate is mixed with sugar and a little cinnamon.)
  • 2 Tablespoons sugar
  • 2 teaspoons salt or to taste

Ingredients assembled

The Process:

  1. Clean the chiles: Remove the stems, open, and devein the chiles. Remove all of the seeds and set them aside. Try to keep the chiles in large pieces so they are more manageable. If you don´t handle chiles often, you should wear gloves.
  2. Put 1 ½ Tablespoons of the seeds of each chile type into a heavy-bottomed skillet over medium high heat. Toast until golden brown then pour into a dish.
  3. Toast the sesame seeds in the same pan until golden brown. Set aside 3 Tablespoons of the sesame seeds for garnish later and add the rest to the chile seeds.
  4. In a large frying pan, heat up about 2 Tablespoons of the lard over medium high heat. Add the tomatillos and onion and cook until nicely browned, about 10-15 minutes. Add the garlic and cook for a few more minutes then stir in the bay leaf, cumin, and aniseed. Transfer to a blender and process into a smooth puree (I used a stick blender for everything, which in some ways was easier. There´s lots of blending in this recipe).
  5. Wipe out the pan and add another 2-3 Tablespoons of the lard and heat until hot and shimmering. Line a baking sheet with absorbent paper. Fry the following ingredients placing them to drain on the paper: Tortilla: just a few seconds on each side. Bread: until golden all around. Almonds: just a few seconds. Raisins: just until they puff up. Cinnamon bark and cloves: just a few seconds.
  6. Add these fried ingredients along with 1 cup of your stock to the tomatillo puree and process into a thick paste.
  7. Add the remaining lard to the same pan and again, heat to shimmering. Fry the chiles, a few at a time, tossing constantly, until they blister. If your fat is hot enough, this should only take about 10-20 seconds. As you finish, transfer them to the paper to drain. If you accidentally burned any of them, discard them as they will make the mole too bitter.
  8. Place the chiles in a large bowl, add hot water to cover and soak for 30 minutes. Stir them every 10 minutes or so to ensure even soaking.
  9. Place the sesame seeds and chile seeds you toasted and set aside earlier and process them in a spice grinder. Add them to the tomatillo paste. If you don´t have a spice grinder, they can just go right in with the nuts and raisins. The spice grinder helps make things more uniform.
  10. Drain the chiles. Add them to the blender with about 1 cup of your stock and process into a smooth puree.
  11. Pour about 1 Tablespoon of the fat into a large, heavy-bottomed pot or Mexican cazuela. Heat over medium-high. Add the complete tomatillo puree and fry, stirring constantly, for about 3 minutes. Add the chile puree and continue cooking and stirring for another 3 minutes.
  12. Break the chocolate into chunks and add it to the mixture along with the sugar and salt. Stir until melted and dissolved.
  13. Add more of your stock about 1 cup at a time, until you reach the desired consistency. It should be a thick sauce, like thin gravy.
  14. Taste and adjust the seasoning. It´s possible you may need to add more sugar if it´s a little too bitter or more chocolate.
  15. Simmer for 30-40 minutes for the flavors to come together.
  16. In batches in a blender or with your stick blender, process the entire mixture one more time.
  17. Pour the sauce through a medium-mesh strainer to remove any little bits of skin or pieces of seeds or nuts that didn´t blend enough. The sauce should now be smooth as silk.
This is everything you should do the day ahead. Let your mole cool, then refrigerate until the next day.

Finishing the Dish:

  1. Reheat the mole to simmering.
  2. Taste and adjust the seasonings one last time.
  3. Add the four pieces of dark meat and set a timer for 15 minutes.
  4. Add the breast quarters and cook all of the chicken in the simmering mole for another 20-25 minutes until the meat is done and tender.
  5. To serve, place one piece of chicken in the center of the plate, pour about a cup of sauce over the top of it, and sprinkle with reserved toasted sesame seeds. Typical sides are red Mexican rice and fresh corn tortillas. Enjoy!

You´ll have leftovers, which is great considering the amount of work that went into this sauce. The mole will keep in the fridge for about a week and in the freezer for several months. You can make enmoladas with it (basically enchiladas with mole), thin it out into a salad dressing, serve it over fish or shrimp, or one of my personal favorites, mole pie. Mole pie is basically a casserole. Shred cooked chicken, pour mole over it, and put it into a baking dish and top with a pie pastry. Bake until the pastry is golden brown and you´re done! Makes a hearty meal.

I hope that you give this sauce a try sometime. The taste isn´t for every palate, but for those of us who do appreciate it, it is some of the best stuff on the planet. I will definitely be making more in the future as I feel the need to perfect the balance of flavors and textures.

Stay tuned as next week I´ll be posting the recap of our week in Mérida!